ব্যাংক আপডেটঃ **ব্যাংক প্রিলির প্রস্তুতির জন্য বিশেষ সংযোজন করা হয়েছে || প্রফেসরস ব্যাংক জবস থেকে বিগত সব প্রশ্নের সমাধানসহ দেওয়া হয়েছে || Model Test সংযোজন করা হয়েছে** || আরও থাকছে Subjet Rewiew & Suggestions***
চাকরির প্রস্তুতিমূলক বইঃ ** ফ্রি E- Book পিডিএফ সম্পূর্ন দেওয়া হয়েছে এই সাইটে ** সংগ্রহ করে নিন
বিসিএস আপডেটঃ ** বিসিএস এর প্রস্তুতির জন্য বিশেষ সংযোজন করা হয়েছে || বিগত ১০তম থেকে ৪০তম বিসিএস প্রশ্নের সমাধানসহ সংযোজন করা হয়েছে***|| Model Test সংযোজন করা হয়েছে**
বেসরকারি শিক্ষক নিবন্ধনি আপডেটঃ ** শিক্ষক নিবন্ধনি পরীক্ষার জন্য সাপ্লিমেন্ট সম্পূর্ন পিডিএফ আকারে দেওয়া আছে ** ডাউনলোড করে নিন ** এছারাও প্রফেসরস শিক্ষক নিবন্ধনি বিগত প্রশ্ন ১ম থেকে ১৬তম পর্যন্ত সমাধানসহ দেওয়া হয়েছে ** প্রয়োজন হলে ডাউনলোড করে নিতে পারেন
এই মাসের আপডেটঃ ** সরকারি চাকরি ও ব্যাংক এর পরীক্ষা সংক্রান্ত নোটিস পাবেন ** এই সাইটের শুরুতেই দেখুন নোটিফিকেশন দেওয়া আছে ** নিয়মিত নোটিফিকেশন পড়ুন তাহলে চাকরির পরীক্ষা বা এডমিট কার্ড মিস হবে না***
এই মাসের আপডেটঃ ** নিজে পড়ুন সেই সাথে শেয়ার করে অন্য একজনকে দিয়ে তার উপকার করুন ** আমদের সাইট যদি আপনার এতটুকু ভালো লাগে থাকে তবে বেশি বেশি শেয়ার করে অন্য একজনের পড়ার সুযোগ করে দিবেন***
এই মাসের আপডেটঃ *** Professors JOB Solution NEW EDITION - 2019-20 সম্পূর্ন বইটির পিডিএফ দেওয়া হয়েছে এই সাইটে ডাউনলোড করে নিন ***
Important Notice: ** এই ওয়েবসাইটের সকল তথ্য / ফাইলসমুহ বিভিন্ন ফেসবুক গ্রুপ এবং বিভিন্ন ওয়েবসাইট থেকে সংগ্রহ করে চাকরি প্রার্থীদের সুবিধার জন্য একত্র করার প্রয়াস মাত্র। JobSeekersClubBD কোন বই / ফাইল স্ক্যান করে না বা তার Pdf তৈরি করে না। কোন ফাইল / Article সম্পর্কে লেখক/প্রকাশক / সত্ত্বাধিকারীর কোন আপত্তি থাকলে অনুগ্রহ করে ফাইল / Article এর নামসহ আমাদের Email করুন। পরবর্তী আপডেটের সময় ইনশাআল্লাহ ফাইল /Article টি ওয়েবসাইট থেকে মুছে ফেলা হবে।
Google Forms is a tool that allows collecting information from users via a personalized survey or quiz. The information is then collected and automatically connected to a spreadsheet. The spreadsheet is populated with the survey and quiz responses. The Forms service has undergone several updates over the years. New features include, but are not limited to, menu search, shuffle of questions for randomized order, limiting responses to once per person, shorter URLs,custom themes, automatically generating answer suggestions when creating forms, and an "Upload file" option for users answering questions that require them to share content or files from their computer or Google Drive. The upload feature is only available through G Suite. In October 2014, Google introduced add-ons for Google Forms, that enable third-party developers to make new tools for more features in surveys.
In July 2017, Google updated Forms to add several new features. "Intelligent response validation" is capable of detecting text input in form fields to identify what is written and ask the user to correct the information if wrongly input. Depending on file-sharing settings in Google Drive, users can request file uploads from individuals outside their respective company, with the storage cap initially set at 1 GB, which can be changed to 1 TB. A new checkbox grid enables multi-option answers in a table. In Settings, users can make changes that affect all new forms, such as always collecting email addresses.
How to Create a Blank Form
Now that you have a Google account, it’s time to create your first Form. Head over to the Google Forms homepage and place the cursor on the multicolored plus sign (+) in the bottom-right corner.
The plus sign turns into a purple pencil icon; click it to create a new form.
How to Customize Your Form
One of the first things you might want to do after you create a new blank form is give it a bit of personality. Google Forms lets you customize the theme and help it stand out by adding an image, color, and font style.
Click the artist’s palette at the top of the screen. From here, you can choose a header image from one of the many stock photos provided (or upload one of your own), the primary color of the form, the background color, and font style.
While customization is lacking when it comes to the theme of forms (aside from being able to upload any image for the header), Google Forms makes up for it with everything else it has to offer.
How to Choose Question Types
When you create a Google Form, you can choose the types of questions you want people to answer. Whether you want static answers from a multiple-choice form or essay-length responses, you can create your ideal form in a snap!
Click the drop-down menu next to the question field.
Then, select the type of question you want from the list.
Your choices those are:
Short Answer: Responses only require a few words. You can set rules people have to follow in their answer with data input validation. Great for email addresses or URLs.
Paragraph: Responses require long-form answers of one or more paragraphs. Data input validation is available for this type of response, as well.
Multiple Choice: People choose between a set of options (one per question). You can include “Other” and an option so people can input a short answer. Depending on a person’s answer, you can also send them to a different section of the form.
Checkboxes: Responders choose one or more of a set of options, including the “Other” option for a short answer. Depending on a person’s answer, you can send them to a different section of the form.
Drop-down: People choose their answer from a set of options in a drop-down menu (one per question). Based on the answer, you can, again, send people to another section of the form.
File Upload: This allows the person to upload a file in response to a question. Uploaded files use Google Drive space for the survey owner. You can specify the size and type of files people can upload.
Linear Scale: People can rate your question on a scale that starts at 0 or 1, and ends on a whole number from 2 to 10.
Multiple Choice Grid: This creates a grid from which people can select one answer per row. Optionally, you can limit answers to one choice per column and shuffle the row order.
Checkbox Grid: This option creates a grid from which people can select one or more answer per row. Optionally, you can limit answers to one choice per column and shuffle the row order.
Date: Responder must choose the date as an answer to the question. The default is day, month, and year. Optionally, you can include the time in people’s answers.
Time: Responder must choose the time of day or a duration of time.
How to Add More Questions
If you’re creating a survey or quiz, you’re likely going to include more than one question on it. Google Forms makes it super-easy to add as many questions as you want, and you can vary the types of questions. You can even separate them into sections, so everything doesn’t appear on a single page.
To add more questions to your form, click the plus sign (+).
To add another section to separate questions, click the icon that looks like two rectangles.
Optionally, you can give the section a name and description to distinguish it from other sections later on.
If you want to add any questions to a different section, it’s simple! Just drag and drop them between sections. At the end of the section, click the drop-down menu to choose where the form should direct people next.
How to Create a Quiz
Google Forms isn’t just for surveys or event invites. Teachers can use Forms to create digital quizzes, which automatically grade, send results (if enabled), and collect student responses.
It’s one of the easiest ways to give students immediate feedback and reduce the amount of time you spend grading quizzes.
Click the Settings cog at the top of the page.
Click the “Quizzes” tab, and then toggle on “Make This a Quiz.”
After you enable quiz mode, you can choose when to release a student’s mark, and what information he can see after he’s submitted his quiz. When you finish, click “Save” to exit the window.
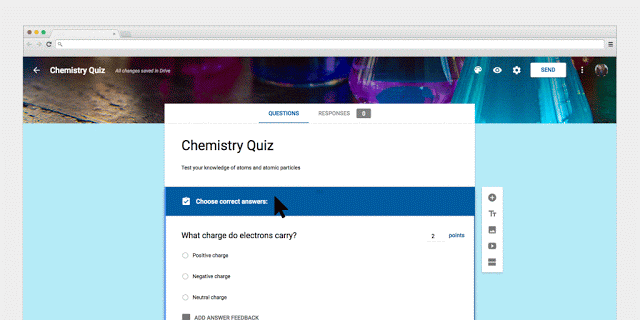
Once you return to your quiz, select one of the questions, and then click “Answer Key” to edit the correct response, and the weight each question has in the quiz.
Here’s where you set the correct answer(s), decide how many points each one is worth, and add answer feedback for the answers to each question.
Click “Edit Question” to close the answer key and save your changes.
Note: While you can only select correct answers for multiple-choice, checkbox, and drop-down questions, you can associate any question with a point value for correctness.
Like all Google suite applications, Forms lets you collaborate with others. Anyone you share a unique link with can edit the questions in your form. This makes it a lot easier to work on the same survey with a group.
To do this, click the three dots at the top of the page, and then click “Add Collaborators.”
Next, under the heading “Who Has Access,” click “Change.”
Select “On – Anyone with the link” to generate a shareable link. Anyone with this link can then access and edit your form. Click “Save.”
Now, you can copy and share the link with anyone you want to have access to your form.
How to Store Responses in Google Sheets
Google Forms stores the answers to your Form automatically. It saves each response in the “Responses” tab at the top of your form and updates in real-time as people answer questions.
However, if you prefer a more in-depth way to analyze responses from your form, you can generate a new Google Sheet—or link to an existing one—to store and view answers. When viewing data stored in a spreadsheet, you can apply many types of calculations and Google Sheets’ functions to create formulas that manipulate your responses.
To do this, select the “Responses” tab, and then click the green Sheets icon.
Next, click “Create” to generate a new spreadsheet to store all your answers.
Each spreadsheet contains all responses, along with a timestamp of when the survey was completed.
If you already have a spreadsheet you want to use, you can do that, too! Instead of clicking “Create,” click “Select existing spreadsheet,” and then click “Select.”
Choose the spreadsheet you want from the list of those saved on your Google Drive, and then click “Select.”
As people answer each question in the form, their responses dynamically appear in the selected Google Sheet spreadsheet.
How to Use a Form Template
Sometimes, you don’t want to think about the format—or questions—of a survey. When that’s the case, you can use a template from the Google Forms template gallery. It has templates for everything from party invites to course evaluation forms.
To get started, head over to the Google Forms homepage and place the cursor on the multicolored plus sign (+) in the bottom-right corner.
The plus sign becomes a purple pencil and purple page icon. Click the purple page icon.
Once the window opens, choose a template from one of the three sections: Personal, Work, or Education.
Click on a template. The form opens in the current tab and saves to your Drive with all your other forms. If you want to add any questions or edit any existing ones, the templates are customizable, just like any other form.
Add the Final Touches
Before you share your form with everyone, be sure to check out the settings. From here, you can collect email addresses, create a confirmation message, limit responses to one per person, and more.
Click the Settings cog at the top of the page.
The first tab has a few settings you can enable. From here, you can collect email addresses and limit each person to one submission. You can also choose whether respondents can edit their answers after they’re submitted or see a summary chart at the end of the survey.
Note: If you enable “Limit to 1 response,” the respondent must log in with their Google account to access your form. Anyone without a Google account won’t be able to submit answers to your form. Unless you’re positive everyone has a Google account, leave this option disabled.
The “Presentation” tab has settings that show a progress bar that lets people know how far along they are in the form. You can also shuffle the question order, show a link to submit the form again (if “Limit to 1 response” is disabled), or compose a confirmation message that respondents see after they submit the form.
After you finish, hit “Save” to save the changes and return to your form.
How to Share Your Form
After you’ve completed creating a form, it’s time to send it out and get some responses. You can share the form via email, a direct link, on your social media account, or you can embed it into your website.
To get sharing, open the form you want to share, and then click “Send.”
Choose how you want to share your form from the options at the top of the pane. From left to right, your choices are: email, direct link, an embedded link for your website, Facebook, and Twitter.
×
নিয়মিত আপডেট পেতে এখনি Subscribe! করে নিন - Step-01: Type your mail id and press on Subscribe Now! Step-02: Go To your mail inbox and Confirm it's actually you !
Your are Activated successfully !
ধন্যবাদ! ... Learn more..


No comments:
Write Comments