ব্যাংক আপডেটঃ **ব্যাংক প্রিলির প্রস্তুতির জন্য বিশেষ সংযোজন করা হয়েছে || প্রফেসরস ব্যাংক জবস থেকে বিগত সব প্রশ্নের সমাধানসহ দেওয়া হয়েছে || Model Test সংযোজন করা হয়েছে** || আরও থাকছে Subjet Rewiew & Suggestions***
চাকরির প্রস্তুতিমূলক বইঃ ** ফ্রি E- Book পিডিএফ সম্পূর্ন দেওয়া হয়েছে এই সাইটে ** সংগ্রহ করে নিন
বিসিএস আপডেটঃ ** বিসিএস এর প্রস্তুতির জন্য বিশেষ সংযোজন করা হয়েছে || বিগত ১০তম থেকে ৪০তম বিসিএস প্রশ্নের সমাধানসহ সংযোজন করা হয়েছে***|| Model Test সংযোজন করা হয়েছে**
বেসরকারি শিক্ষক নিবন্ধনি আপডেটঃ ** শিক্ষক নিবন্ধনি পরীক্ষার জন্য সাপ্লিমেন্ট সম্পূর্ন পিডিএফ আকারে দেওয়া আছে ** ডাউনলোড করে নিন ** এছারাও প্রফেসরস শিক্ষক নিবন্ধনি বিগত প্রশ্ন ১ম থেকে ১৬তম পর্যন্ত সমাধানসহ দেওয়া হয়েছে ** প্রয়োজন হলে ডাউনলোড করে নিতে পারেন
এই মাসের আপডেটঃ ** সরকারি চাকরি ও ব্যাংক এর পরীক্ষা সংক্রান্ত নোটিস পাবেন ** এই সাইটের শুরুতেই দেখুন নোটিফিকেশন দেওয়া আছে ** নিয়মিত নোটিফিকেশন পড়ুন তাহলে চাকরির পরীক্ষা বা এডমিট কার্ড মিস হবে না***
এই মাসের আপডেটঃ ** নিজে পড়ুন সেই সাথে শেয়ার করে অন্য একজনকে দিয়ে তার উপকার করুন ** আমদের সাইট যদি আপনার এতটুকু ভালো লাগে থাকে তবে বেশি বেশি শেয়ার করে অন্য একজনের পড়ার সুযোগ করে দিবেন***
এই মাসের আপডেটঃ *** Professors JOB Solution NEW EDITION - 2019-20 সম্পূর্ন বইটির পিডিএফ দেওয়া হয়েছে এই সাইটে ডাউনলোড করে নিন ***
Important Notice: ** এই ওয়েবসাইটের সকল তথ্য / ফাইলসমুহ বিভিন্ন ফেসবুক গ্রুপ এবং বিভিন্ন ওয়েবসাইট থেকে সংগ্রহ করে চাকরি প্রার্থীদের সুবিধার জন্য একত্র করার প্রয়াস মাত্র। JobSeekersClubBD কোন বই / ফাইল স্ক্যান করে না বা তার Pdf তৈরি করে না। কোন ফাইল / Article সম্পর্কে লেখক/প্রকাশক / সত্ত্বাধিকারীর কোন আপত্তি থাকলে অনুগ্রহ করে ফাইল / Article এর নামসহ আমাদের Email করুন। পরবর্তী আপডেটের সময় ইনশাআল্লাহ ফাইল /Article টি ওয়েবসাইট থেকে মুছে ফেলা হবে।
To get started, sign into your Google Drive account, click New, point to More, and select Google Forms. You can also start from the Google Forms web page, clicking the Create a free form link.
The actual process of building a survey — or form — is pretty simple. If you’ve ever used Google Docs before, you should feel right at home. By default, Google Forms creates a simple form with a single question, and you can enter a title for the form, a question, and answers.
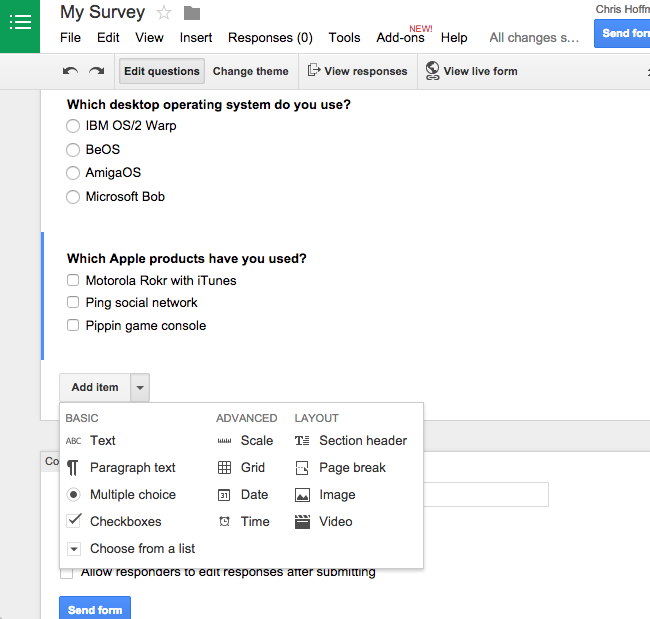
You can continue adding as many questions as you want with the Add item button. You can have the user select one item from a list, check as many items off as they want, or type a response into a small text box type a paragraph into a larger text box.
The Add Item button also allows you to add additional formatting elements, so you can divide your survey into sections, split it into multiple pages, or add images and videos.
Despite its simple look, you can do a lot with this tool. For example, you can send survey-takers to different pages of questions depending on how they answer a question. You can randomize the order of the questions. Google Apps users can automatically collect the email address of respondents on their domain. You can customize your confirmation page and choose whether to show people who have answered the quiz a summary of the answers others provided.
And, as with other Google Docs files, you can invite people to work on the survey with you and work on it together in real time.
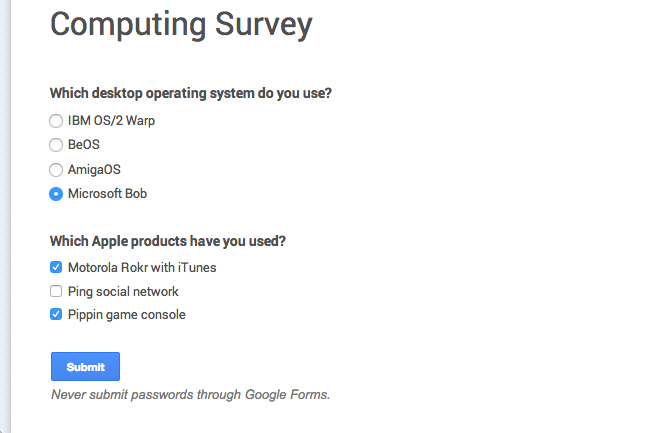
Preview Your Form
To preview your survey, click the “View live form” button at the top of the document. The form is hosted on Google’s website, just like shared Googel Docs files, but it’s interactive. You can’t hide the prominent “Never submit passwords through Google Forms” warning, which exists to ensure phishers can’t make convincing fake login dialogs and trick people into submitting their Google password.
If you think the default plain-white survey theme looks a bit bland and boring, you can click the Change theme button and choose a theme. Click the View live form button again after to preview how it looks.
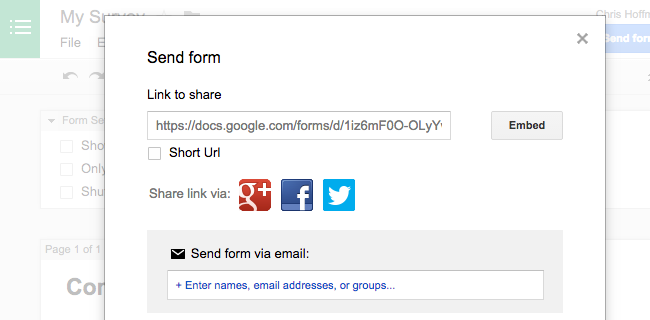
Share Your Form
Now you have a survey, but you need to provide a link to other people so they can actually fill it out. Just click the Send Form button at the top-right corner of the page and you’ll get an URL. This URL is a public address. Anyone who visits it can fill out your form. You can email this link to various people, share it on social media, send it via SMS or instant message, post it on a website, or do whatever else you want with it.
View the Responses
If you just need to see a quick summary of your overall responses, you can click View > Summary of Responses while editing the form to see a simple summary of your responses — pie charts, bar graphs, lists, and whatever else is appropriate. This should be pretty good for most people creating a simple survey.
You can also output your responses to a spreadsheet, which allows you to do much more with the data. While editing the form, click Responses > Choose response destination. You’ll be able to create a new spreadsheet or a new sheet in an existing spreadsheet file. When someone submits new responses through your form, the data will be entered directly into the spreadsheet. When you link a form to a spreadsheet, all the previously submitted responses will be sent straight to that spreadsheet, so you don’t have to worry about losing data.
The spreadsheet can function as a simple list of the responses you receive. You can also use all the typical spreadsheet-manipulation and data-analysis tools to work with the data.
That’s about it. Google Forms isn’t the only tool for creating web-based surveys, and you’ll probably find ones with fancier features and interfaces out there. But Google Forms is simple and easy to use, with no limits on the number of questions you can enter or responses you can receive. And it gets all that juicy data right into a Google Docs spreadsheet so you can start analyzing it immediately.
Google Forms is the easiest way to make a fillable form online. Most Google Forms look similar, but you can make your form stand out and fit with your event, website, or company’s branding.
Selecting a Template
The first way of customizing a Google Form is by selecting a template from the gallery. Google offers 17 different templates that you can use to quickly set-up the kind of form that you need. These templates are divided into several types:
Personal: These are forms for personal use, such as invitations, person-to-person selling, contact forms, and meeting schedules.
Work: These forms should be used for your workplace or business, like customer feedback forms and job applications for prospective hires.
Education: These are to be used for an educational institution, such as for quizzes or class assessments.
Blank: Use this to start an entirely new form from scratch.
These form templates have preset question types that you can modify or delete if they don’t apply to your needs. They make a good jumping-off point for making your own templates, as you can customize them further and save them as a custom template.
To select a template, go to the Google Forms homepage and click “Template Gallery” at the upper- right corner. Before editing the template, make sure to change the form name at the upper right.
Customizing the Background and Theme Color
Another thing you can do is customize the background and theme color of a form. To do this, when you’re in your Google Form, click the palette button at the top right of the page to bring up the “Theme Options” sidebar.
From here, you can select one of the default theme colors available, or use your own with the RGB color picker. This automatically sets the color scheme of your entire form, including accent colors and the default header color.
You can also select one of four background colors for your forms. These include a neutral grey color and light, medium, and dark versions of your theme color.
Customizing the Header Image
Another way to customize your Google Form is by changing the header image that appears at the top of every page. This is a great way to visually describe what your form is all about.
In your Google Form edit page, go to “Theme Options” again, and select “Choose Image.” From here, you can select from a range of stock options Google provides, which are divided into several categories based on usages like “Birthday” and “Wedding.”
You can also use your own pictures. Click Upload to add an image from your computer, or Photos to select one of the images in your Google Photos library.
Changing the Font
You can also change the font of a Google Form, albeit with only a few options available. To do this, go to Theme Options and scroll down to “Font Style.”
From here, you can pick one of the following:
Basic: Sans-Serif Roboto
Decorative: Script Parisienne
Formal: Serif Cormorant Garamond
Playful: Handwritten Patrick Hand
Presentation Settings
You also can change a few things via the “Presentation Settings” menu. To access this, click Settings at the upper-right corner of the page, then go to the “Presentation” tab.
From here, you can change whether or not to have a progress bar, and set a custom confirmation message for your form. The progress bar is a way of showing a respondent how much of the form is left after they finish a question. This is especially helpful for students who are taking a quiz using Google Forms.
The custom confirmation message can contain text, links, or contact information. If this is not filled out, it will default to “Your response has been recorded.”
There are many skills when it comes to executing a good spreadsheet. Keep reading to learn a few advanced spreadsheet skills that will have the whole office lining up to learn at your hand.
Data Entry, Sorting, and Filtering
The idea behind a spreadsheet is compiling clean data that can be sorted by an array of different functions.
If you are working with spreadsheets day-to-day, you will definitely want to utilize the sorting features to manipulate how you visualize your data.
Applying Data Validation
There are a few advanced spreadsheet skills involving data entry but one of the best is definitely data validation.
When it comes to data entry, there may be instances where you would like to limit what can be put into a cell. Data validation allows you to define the parameters that you may want to put on a cell.
Protecting Sheets and Locking Cells
This advanced spreadsheet skill is a lifesaver when you're preparing a spreadsheet that is going to be used by a group.
The last thing you would want is for data to be altered or lost when others are working on a document. It will be very helpful for you to lock the cells that should not be edited.
Custom Filtering
Even the most green of spreadsheet users have dabbled in filtering their data. Within the filters that you have probably already played around with there are many other more advanced filtering options.
Using the more advanced options, you can really tailor your data based on what you are looking to analyze.
Another way that you can use filters is for duplications in your data. You can filter out duplicates through the Data tab. Filtering out the duplicates will create an additional column with just the information that you are looking for.
Sort by Column
Sometimes you may have a specific category of data that you may want to work with and manipulate. The sort by column function is similar to that of your iTunes library and is another super helpful way to view your data.
Pivot Tables
Pivot tables are one of the most popular advanced spreadsheet skills for those that are working with large amounts of data.
If you have too much data, it is almost useless if you don't have a way of analyzing it.
Pivot tables will allow you to take some of your data and information and summarize it so you only see what you want to see. This is another reason why it is important to have clean data, so it can be sorted and summarized.
While pivot tables can seem overwhelming to the untrained eye, they can be used to summarize pretty much anything and their potential purposes are very vast.
Macros and Scripts
Using macros is a very advanced spreadsheet skill that can help you to automate complex processes.
Tasks can get redundant when you are working in spreadsheets for hours on end and using macros can cut your time working on specific things drastically. You can record things that you're going over and over again into a macro.
Sometimes using macros can require some programming knowledge which takes a bit of learning. However, there are other macros that are more basic, useful, and time-saving that are relatively easy to learn.
Combine Multiple Functions to Create Formulas
Creating formulas is definitely one of the more advanced spreadsheet skills and is often the reason that many people shy away from wanting to learn the nitty-gritty of spreadsheet work.
Formulas are multiple functions put together in one cell. Using formulas can allow you to quickly make calculations and get sums of multiple columns, rows, or cells in a spreadsheet.
Perform Calculations
Whether it be basic math or more advanced calculations, spreadsheets can be great for doing either.
The SUM function can add the contents of two columns together.
Simple math can be done by using typical math shorthand operators (+, -, *, /). You can add up as many columns as you would like. For example, enter the following =(A1+A2+A3+A4).
Additionally, you can make statistical calculations. Functions like average and mean can come in handy in your day-to-day life and luckily these can easily be done in a spreadsheet.
One more helpful mathematical function that you can use spreadsheets for is calculating dates and times within cells.
Put your Advanced Spreadsheet Skills to the Test
Do you feel like a spreadsheet master after hearing all our pro tips? Time to put your new advanced spreadsheet skills to the test.
There are a few things listed above that you should definitely keep in mind.
First, there are so many ways to manipulate data to show only what you really need. Whether you are looking to sort, filter, or even enter your data in a special way, your spreadsheet can do that for you.
Next, formulas are your friend! Combining different functions is about to save you all the time in the world. While formulas do tend to be the most overwhelming or scary part of working on a spreadsheet, once you learn how to use them to your advantage you will be deemed advanced in no time.
Google Sheets is a free, cloud-based spreadsheet application. That means you open it in your browser window like a regular webpage, but you have all the functionality of a full spreadsheet application for doing powerful data analysis. It really is the best of both worlds.
No doubt you’ve heard of Microsoft Excel, the long established heavyweight of the spreadsheet world. It’s an incredibly powerful, versatile piece of software, used by approximately 750 million – 1 billion people worldwide. So yeah, a tough act to follow.
Google Sheets is similar in many ways, but also distinctly different in other areas. It has (mostly) the same set of functions and tools for working with data. In fact, some people mistakenly call it “Google Excel” or “Google spreadsheets.”
Formulas make Excel smart. With out them, Excel is just a data keeping tool. But by using formulas, you can crunch data, analyze it and get answers to most complex questions. While anyone can use a simple SUM or IF formula, an advanced user of it would be able to seamlessly write & combine formulas like SUMIFS, SUMPRODUCT, INDEX, MATCH, LOOKUP formulas. Apart from knowing the formulas, advanced Excel users know how to debug them, audit them and how to use which formula for which occasion (and they also know few alternatives for any given formula problem).
Resources to learn Advanced Excel Formulas
SUMIFS
SUMPRODUCT
VLOOKUP | XLOOKUP
INDEX + MATCH
Handling Formula Errors
Array Formulas
Circular References
Formula Auditing
Resources to learn Advanced Charting
Selecting Right Chart
Interactive charts in Excel
Combine two chart types – demo
In-cell charts
Budget vs. Actual data – Advanced Chart
Sparklines
More
Pivot Tables & Pivot Reporting
Pivot tables & pivot reporting allows us to analyze massive amounts of data & answer questions with just a few clicks. Advanced users of Excel are very familiar with various features of Pivot tables & can use them really well. Some of the advanced pivot table features are – relationships, multi-tale pivots, grouping, slicers, measures (Power Pivot) & summary by different type of metrics.
Resources to learn Conditional Formatting
Introduction
5 Tips on CF
Highlighting Duplicates
Hourly goals tracker – Advanced CF demo
More
VBA & Macros
Excel’s own language – VBA, allows us to give instructions to Excel to get things done. This is a simple, but extremely powerful way to extend Excel’s functionality. Advanced users of Excel are familiar with VBA & can write macros to automate their day to day work, thus saving countless hours of time & money.
Introduction to VBA
Understanding VBA Variables, Conditions & Loops
Find and extract matching values with VBA – Example
VBA Examples
VBA Online Course
More
Excel Pivot Table Topics:
In this guide, you can learn the following topics. Click on relevant link to access the information. 1. What is a Pivot Table? 2. How to Create a Pivot Table in Excel? 3. Pivot Tables – Top 5 Tips & Tricks 4. Advanced Pivot Table Techniques
1. Grouping Data in Pivot Reports 2. Using Report Filters 3. Using Pivot Table Slicers
5. More Pivot Table Examples & Techniques 6. Training Programs on Pivot Tables 7. Books on Pivot Tables 8. Additional Resources on Excel Pivot Tables
Google Forms is a tool that allows collecting information from users via a personalized survey or quiz. The information is then collected and automatically connected to a spreadsheet. The spreadsheet is populated with the survey and quiz responses. The Forms service has undergone several updates over the years. New features include, but are not limited to, menu search, shuffle of questions for randomized order, limiting responses to once per person, shorter URLs,custom themes, automatically generating answer suggestions when creating forms, and an "Upload file" option for users answering questions that require them to share content or files from their computer or Google Drive. The upload feature is only available through G Suite. In October 2014, Google introduced add-ons for Google Forms, that enable third-party developers to make new tools for more features in surveys.
In July 2017, Google updated Forms to add several new features. "Intelligent response validation" is capable of detecting text input in form fields to identify what is written and ask the user to correct the information if wrongly input. Depending on file-sharing settings in Google Drive, users can request file uploads from individuals outside their respective company, with the storage cap initially set at 1 GB, which can be changed to 1 TB. A new checkbox grid enables multi-option answers in a table. In Settings, users can make changes that affect all new forms, such as always collecting email addresses.
How to Create a Blank Form
Now that you have a Google account, it’s time to create your first Form. Head over to the Google Forms homepage and place the cursor on the multicolored plus sign (+) in the bottom-right corner.
The plus sign turns into a purple pencil icon; click it to create a new form.
How to Customize Your Form
One of the first things you might want to do after you create a new blank form is give it a bit of personality. Google Forms lets you customize the theme and help it stand out by adding an image, color, and font style.
Click the artist’s palette at the top of the screen. From here, you can choose a header image from one of the many stock photos provided (or upload one of your own), the primary color of the form, the background color, and font style.
While customization is lacking when it comes to the theme of forms (aside from being able to upload any image for the header), Google Forms makes up for it with everything else it has to offer.
How to Choose Question Types
When you create a Google Form, you can choose the types of questions you want people to answer. Whether you want static answers from a multiple-choice form or essay-length responses, you can create your ideal form in a snap!
Click the drop-down menu next to the question field.
Then, select the type of question you want from the list.
Your choices those are:
Short Answer: Responses only require a few words. You can set rules people have to follow in their answer with data input validation. Great for email addresses or URLs.
Paragraph: Responses require long-form answers of one or more paragraphs. Data input validation is available for this type of response, as well.
Multiple Choice: People choose between a set of options (one per question). You can include “Other” and an option so people can input a short answer. Depending on a person’s answer, you can also send them to a different section of the form.
Checkboxes: Responders choose one or more of a set of options, including the “Other” option for a short answer. Depending on a person’s answer, you can send them to a different section of the form.
Drop-down: People choose their answer from a set of options in a drop-down menu (one per question). Based on the answer, you can, again, send people to another section of the form.
File Upload: This allows the person to upload a file in response to a question. Uploaded files use Google Drive space for the survey owner. You can specify the size and type of files people can upload.
Linear Scale: People can rate your question on a scale that starts at 0 or 1, and ends on a whole number from 2 to 10.
Multiple Choice Grid: This creates a grid from which people can select one answer per row. Optionally, you can limit answers to one choice per column and shuffle the row order.
Checkbox Grid: This option creates a grid from which people can select one or more answer per row. Optionally, you can limit answers to one choice per column and shuffle the row order.
Date: Responder must choose the date as an answer to the question. The default is day, month, and year. Optionally, you can include the time in people’s answers.
Time: Responder must choose the time of day or a duration of time.
How to Add More Questions
If you’re creating a survey or quiz, you’re likely going to include more than one question on it. Google Forms makes it super-easy to add as many questions as you want, and you can vary the types of questions. You can even separate them into sections, so everything doesn’t appear on a single page.
To add more questions to your form, click the plus sign (+).
To add another section to separate questions, click the icon that looks like two rectangles.
Optionally, you can give the section a name and description to distinguish it from other sections later on.
If you want to add any questions to a different section, it’s simple! Just drag and drop them between sections. At the end of the section, click the drop-down menu to choose where the form should direct people next.
How to Create a Quiz
Google Forms isn’t just for surveys or event invites. Teachers can use Forms to create digital quizzes, which automatically grade, send results (if enabled), and collect student responses.
It’s one of the easiest ways to give students immediate feedback and reduce the amount of time you spend grading quizzes.
Click the Settings cog at the top of the page.
Click the “Quizzes” tab, and then toggle on “Make This a Quiz.”
After you enable quiz mode, you can choose when to release a student’s mark, and what information he can see after he’s submitted his quiz. When you finish, click “Save” to exit the window.
Once you return to your quiz, select one of the questions, and then click “Answer Key” to edit the correct response, and the weight each question has in the quiz.
Here’s where you set the correct answer(s), decide how many points each one is worth, and add answer feedback for the answers to each question.
Click “Edit Question” to close the answer key and save your changes.
Note: While you can only select correct answers for multiple-choice, checkbox, and drop-down questions, you can associate any question with a point value for correctness.
Like all Google suite applications, Forms lets you collaborate with others. Anyone you share a unique link with can edit the questions in your form. This makes it a lot easier to work on the same survey with a group.
To do this, click the three dots at the top of the page, and then click “Add Collaborators.”
Next, under the heading “Who Has Access,” click “Change.”
Select “On – Anyone with the link” to generate a shareable link. Anyone with this link can then access and edit your form. Click “Save.”
Now, you can copy and share the link with anyone you want to have access to your form.
How to Store Responses in Google Sheets
Google Forms stores the answers to your Form automatically. It saves each response in the “Responses” tab at the top of your form and updates in real-time as people answer questions.
However, if you prefer a more in-depth way to analyze responses from your form, you can generate a new Google Sheet—or link to an existing one—to store and view answers. When viewing data stored in a spreadsheet, you can apply many types of calculations and Google Sheets’ functions to create formulas that manipulate your responses.
To do this, select the “Responses” tab, and then click the green Sheets icon.
Next, click “Create” to generate a new spreadsheet to store all your answers.
Each spreadsheet contains all responses, along with a timestamp of when the survey was completed.
If you already have a spreadsheet you want to use, you can do that, too! Instead of clicking “Create,” click “Select existing spreadsheet,” and then click “Select.”
Choose the spreadsheet you want from the list of those saved on your Google Drive, and then click “Select.”
As people answer each question in the form, their responses dynamically appear in the selected Google Sheet spreadsheet.
How to Use a Form Template
Sometimes, you don’t want to think about the format—or questions—of a survey. When that’s the case, you can use a template from the Google Forms template gallery. It has templates for everything from party invites to course evaluation forms.
To get started, head over to the Google Forms homepage and place the cursor on the multicolored plus sign (+) in the bottom-right corner.
The plus sign becomes a purple pencil and purple page icon. Click the purple page icon.
Once the window opens, choose a template from one of the three sections: Personal, Work, or Education.
Click on a template. The form opens in the current tab and saves to your Drive with all your other forms. If you want to add any questions or edit any existing ones, the templates are customizable, just like any other form.
Add the Final Touches
Before you share your form with everyone, be sure to check out the settings. From here, you can collect email addresses, create a confirmation message, limit responses to one per person, and more.
Click the Settings cog at the top of the page.
The first tab has a few settings you can enable. From here, you can collect email addresses and limit each person to one submission. You can also choose whether respondents can edit their answers after they’re submitted or see a summary chart at the end of the survey.
Note: If you enable “Limit to 1 response,” the respondent must log in with their Google account to access your form. Anyone without a Google account won’t be able to submit answers to your form. Unless you’re positive everyone has a Google account, leave this option disabled.
The “Presentation” tab has settings that show a progress bar that lets people know how far along they are in the form. You can also shuffle the question order, show a link to submit the form again (if “Limit to 1 response” is disabled), or compose a confirmation message that respondents see after they submit the form.
After you finish, hit “Save” to save the changes and return to your form.
How to Share Your Form
After you’ve completed creating a form, it’s time to send it out and get some responses. You can share the form via email, a direct link, on your social media account, or you can embed it into your website.
To get sharing, open the form you want to share, and then click “Send.”
Choose how you want to share your form from the options at the top of the pane. From left to right, your choices are: email, direct link, an embedded link for your website, Facebook, and Twitter.
×
নিয়মিত আপডেট পেতে এখনি Subscribe! করে নিন - Step-01: Type your mail id and press on Subscribe Now! Step-02: Go To your mail inbox and Confirm it's actually you !
Your are Activated successfully !
ধন্যবাদ! ... Learn more..